Timesheets MTS Software ..... your source for accurate, cost effective, and easy to use timesheet and time tracking software

Home
A weblog from the authors of Timesheets MTS and Timesheets Lite, cost effective timesheet and time and billing software

Recently in Using the Software Category

In most places it's now 2016 and if you're a Timesheets MTS user you might be receiving an error message when trying to record a timesheet entry. The message probably says something like this:

No period is defined for this date.
Someone with Super User privileges must define a period covering this date

In 2015 Timesheets MTS automatically created a period that covered all of 2015 but now that we have seen in a new year a new period must be created to cover it. This is easily done by logging into Timesheets MTS as a super user and going to the Tools->Options->Periods menu and adding a new period to cover the new year. Or you could create several periods to cover the year and even create new periods to cover next year and the year after.

If you were wondering why Timesheets MTS has time periods then there's two reasons. The first, is to stop users entering timesheets entries into the future. The second is to stop them from changing (or adding) timesheet entries to previous periods (because they've been locked for accounting purposes).


By Mark Nemtsas at 1:29 PM


April 27, 2015

Uninstalling our Software


Uninstalling our software couldn't be any easier. Just follow these easy instructions:

First step is to open the Windows Control panel, which you can see below. Select the Programs - Uninstall a program option.

Open the Windows Control Pane

You'll then be shown the screen below. Choose the Uninstall a program option.

Choose the uninstall program option

Find the software you want to uninstall in the installed program list that is shown to you (see below) and double click on it.

Select the software from the program list

Confirm that you want to uninstall the software.

Confirm the uninstall

Let the process run and when done you'll be shown the message below indicating the software was successfully removed from your computer.

Uninstall complete!

By Mark Nemtsas at 10:11 AM


April 27, 2015

Installing our Software


Installing our software products is simple. Just follow these steps:

1. Double Click on the Downloaded Installation File

Once the installation file has finished downloading to your PC you can double click on the downloaded file to start the software installing.

2. Run the Installation File

Depending on how your computer is setup you might see a security window when you run one of our installation files. It should say that the publisher is Timesheets MTS Software, if it does not please contact us To proceed click the Run button.

3. Start the Program Installer

The installer should now start. Read the instructions displayed and click the Next button to continue.

4. Accept the Licence Agreement

Our software installers will now display the licence agreement. If you are happy with the agreement you must accept it by selecting the I accept the agreement option and clicking the Next button to proceed.

5. Select Destination Location

It's strongly recommended that you leave the destination location as suggested by the installer. Click the Next button to proceed. Note that if you've installed the software on your computer before you might get a warning that already exists. Would you like to install in that folder anyway? If you do, click Yes to continue.

6. Select Start Menu Folder

It's strongly recommended that you leave the start menu folder as suggested by the installer. Click the Next button to proceed.

7. Select Additional Tasks

Check the Create a desktop icon checkbox if you want a shortcut to the software created on your Windows desktop. Check the Create a Quick Launch icon checkbox if you want a shortcut to to the software created in the quick launch area of your Windows taskbar. Click the Next button to proceed.

8. You're Ready to Install!

Now that the installer has got all the information it needs from you it's time for the software to be installed. Click the Install button to get started.

10. You're Done!

Your software installation is now complete. Check the Launch checkbox if you want the software start running when you close the installer. Click the Finish button and you're done.

By Mark Nemtsas at 9:58 AM

Pyramid Displays in Queensland, Australia are specialist exhibition and tradeshow booth designers, suppliers and manufacturers. They also happen to use our employee timesheet software, Timesheets Lite to track all of their project work. David Van Gent, the project manager at Pyramid Displays was kind enough to spend 30 minutes with me earlier this week taking me through how his company uses TImesheets Lite. David did this via phone hookup also shared his computer desktop with me so I could actually see Timesheets Lite in action.

Key things to come out David's presentation were:

  • Pyramid Displays makes heavy use of the background color features of both projects and common activities. They use the colors to categorize projects and activities and match activities with particular project types.
  • Timesheets Lite was the best match they could find to the way they did business. They had considered several (much) more expensive timesheet products but they were simply too complex and the cost could not be justified.
  • They enter projects into Timesheets Lite while still in the quote phase and would love a feature to prevent employees from booking time to a project while it is still in a quote stage.
  • Employees make use of the calendar based timesheet to drag and drop times between days. This speeds up the process of creating a timesheet for a new day.
  • The volume of projects they put into TImesheets Lite is large and they'd love a way of archiving projects.
  • Having a common activity list accessible to all projects is great but from time to time they'd like to be able to restrict the activities that are available to certain projects.

I'd like to thank David for the time he took with me and would heartily recommend contacting Pyramid Displays if you're looking for trade show or exhibition booth design or equipment hire on the Gold Coast in Australia!


By Mark Nemtsas at 12:10 PM

Editing Another Employees Timesheet

A recent release of our employee timesheet software Timesheets Lite added the ability for some users to edit other employee timesheets. Above you can see a screenshot of the employee timesheet with the employee timesheet dropdown highlighted in red.

If the logged in employee is a super user (see here for a discussion on employee security levels in Timesheets Lite) then they'll be able to select other employees names from the dropdown. When another employee is selected their timesheet data will be displayed. That data can then me added to, edited, or deleted exactly the same as the employee's own data. The task timer cannot be used to record time for another employee. This is the only real restriction on working with another employees data.


By Mark Nemtsas at 1:27 PM

In most parts of the world it is now 2013. This means in a lot of cases you may find that when you try to add activity to a project in Timesheets MTS that you get a message box popping up saying:

No period is defined for this date.
Someone with Super User privileges must define a period covering this date

By default for the last year the software created a single period covering all of 2012. Now that we are in 2013 this has expired and you must create a new period. To do this just log into Timesheets MTS as a super user and go to the Tools->Options->Periods menu and add some new periods covering the coming year (or several years if you like).

For your reference you can make use of periods to stop forward posting by users or to stop users editing data in previous periods.


By Mark Nemtsas at 7:42 AM

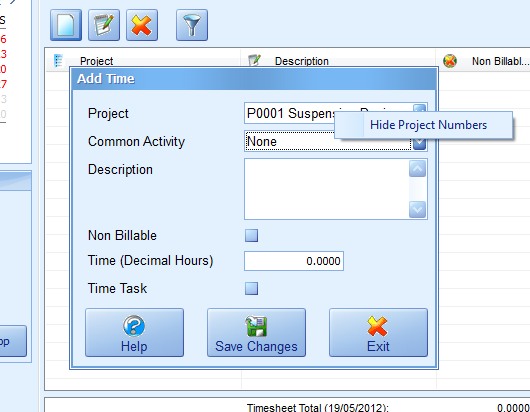
Users of Timesheets Lite with long project lists will often find a project quickly in the project drop down list on the Add / Edit Times screen by typing the first few characters of the project number. This works fine in most cases but some employees may prefer to auto-match their projects by project name rather than project number. To allow this it's quite simple to hide the projects in the project drop down list. Here's the steps to follow:


Hide Project Numbers Popup Menu


  • Load up the Add/Edit Time screen from the timesheet and then right click on the project drop down box. A small popup menu will appear. See the image above for what this looks like.

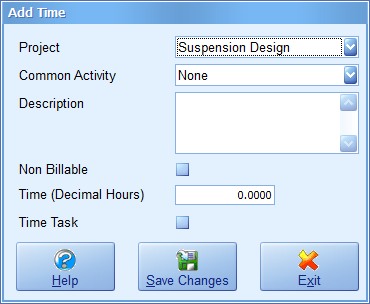
  • Click on the Hide Project Numbers menu and the project numbers in the project drop-down will then be hidden (see the image below).


Project Numbers Hidden in Drop-Down

To show the hidden project numbers again it's just a matter of right clicking on the project drop-down again and clicking the "Show Project Numbers" menu option.


By Mark Nemtsas at 2:17 PM


February 29, 2012

Registering Timesheets Lite


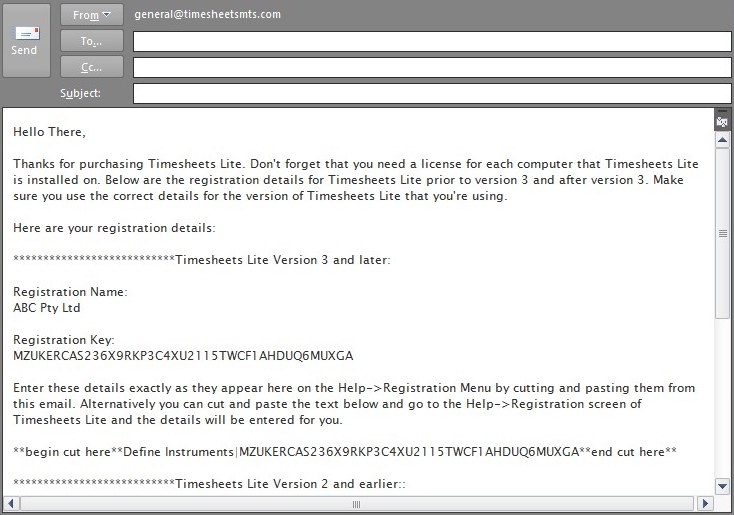
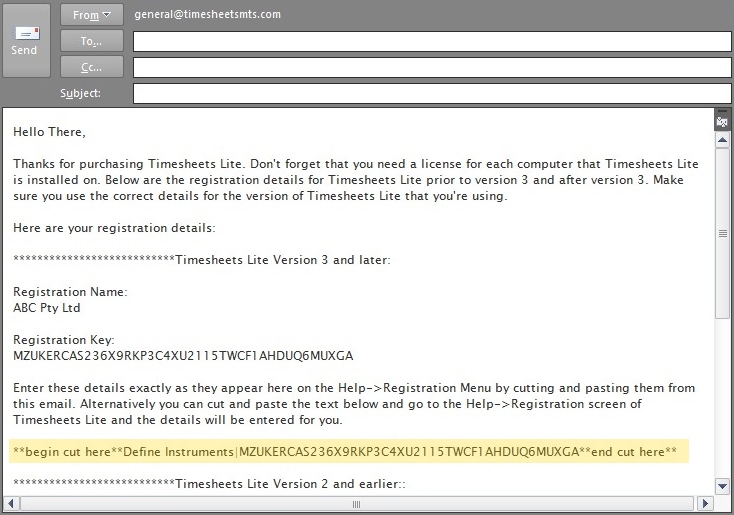
When you purchase Timesheets Lite you'll get an email from us containing your registration details. These details can be entered on the Help->Registration screen of Timesheets Lite. Your registration email will look something like the image below.


Timesheets Lite Registration Email

The basic process for registering the software is as follows:

  1. Start up Timesheets Lite and go to the Help->Registration screen.
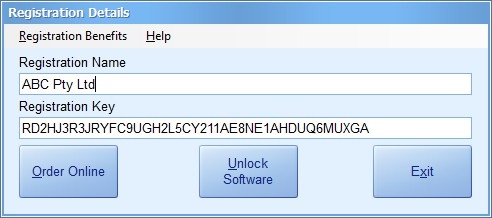
  2. Copy the Registration Name from the email and paste it to the Registration Name field in Timesheets Lite.
  3. Copy the Registration Key from the email and paste it to the Registration Key field in Timesheets Lite.

  4. Timesheets Lite Registration Email
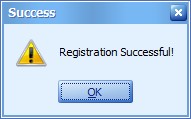
  5. Once you're happy with the details click the Unlock Software button. If you've entered the registration information correctly you'll get a registration successful message (see below).

  6. Registration Successful!

Timesheets Lite also offers a quicker and easier way of registering the software. If you want to try this method here are the steps:


Timesheets Lite Registration Email
  1. Copy the Registration License shortcut text from the registration email. This is highlighted in the email above. This text starts with **being cut here** and ends with the text **end cut here**.
  2. Start up Timesheets Lite and go to the Help->Registration page. Timesheets Lite will detect the Timesheets Lite registration information in the Windows Clipboard and show you the prompt below.

  3. Registration Details Detected
  4. Click Yes and the Registration screen will be shown with the Registration Name and Registration Key fields already filled in for you!
  5. Click the Unlock Software button you'll get a registration successful message.

By Mark Nemtsas at 1:10 PM

Based on my experience on working with contractors it is not all that unusual to receive an invoice for every project they happen to be working on with you. In some cases this isn't a bad thing and actually makes your ( the customers) internal accounting procedures a little easier. Of course some customers don't like getting one invoice for every project and would prefer to receive one invoice bundling up charges for all projects that you, as the consultant, are working on. Timesheets MTS allows you to use either of these two methods. In a nutshell here's how to do it:

  1. Log into Timesheets MTS with a user account that can generate invoices (financial user or super user) and go to the Invoices screen (using the main toolbar).
  2. Click the New Invoice button.
  3. Give the new invoice an invoice number (if you don't have auto numbering switched on) and select the invoice customer.
  4. Now we have to allocate billable activity to the invoice. Click on the Invoice Line Items tab and then click the Get Invoice Line Items button.
  5. On the left hand side of the new window that will pop up you can see a project list. This is where you can choose to invoice one, many, or all of the projects for the selected customer. Just select the projects you want to invoice.
  6. Select the date range for the activity you are going to bill, and then click the Get Details button to get the billable activity. If you are happy with the details click the Accept Details button. You'll be taken back to the main Invoice screen now.
  7. If you are happy with the invoice you can now save it, and print it out for issuing to your customer.
So that's all there is to it. As usual please email us with any questions.

By Mark Nemtsas at 11:35 AM